Для чего нужно проверять ссылки?
Онлайн-проверка ссылок средствами Антивируса Dr.Web позволит определить, есть ли на странице, которую Вы хотите посетить, или в файле, который Вы хотите скачать:
* Почтовые черви * Сетевые черви * Файловые вирусы * Троянские программы * Стелс-вирусы* Полиморфные вирусы* Бестелесные вирусы* Макро-вирусы* Вирусы, поражающие документы MS Office * Скрипт-вирусы * Шпионское ПО (Spyware) * Программы-похитители паролей * Клавиатурные шпионы* Программы-дозвонщики* Рекламное ПО (Adware) * Потенциально опасное ПО * Хакерские утилиты * Программы-люки * Программы-шутки * Вредоносные скрипты * Другие нежелательные коды*
Как это действует?
Установив онлайн-проверку ссылок Dr.Web к Opera Вы сможете проверять на вирусы любые страницы в Интернете до их посещения, любые файлы до их скачивания на Ваш компьютер при помощи самой последней версии антивируса Dr.Web с полным набором вирусных баз!
Устанавливать антивирус не нужно. Проверка осуществляется на серверах компании "Доктор Веб".
Время проверки зависит от объема проверяемого файла — от нескольких секунд до нескольких минут. Ограничение на размер проверяемого файла 12 МБ!
По результатам проверки Вы сможете принять решение о скачивании файла или о посещении интересующей Вас страницы, не опасаясь вирусной атаки.
Как подключить онлайн-проверку ссылок?
Чтобы включить возможность онлайн-проверки ссылок из контекстного меню пользователям Опера, нужно проделать следующие действия.
Добавьте строки в трёх местах конфигурационного файла standard_menu.ini (по умолчанию данный файл находится в каталоге \Opera\defaults\). Соответствующие строки для добавления необходимо вставить в секциях: [Link Popup Menu], [Document Popup Menu] и [Image Link Popup Menu] как указано ниже (строки для вставки начинаются с 'Item, "Scan link with Dr.Web"' и заканчиваются '""'):
...
[Link Popup Menu]
Item, 67389 = Open link
Item, 53018 = Open link in new page
Item, 53019 = Open link in background page
--------------------1
Item, 54020 = Open link in new window
Item, 67633 = Open link in background window
--------------------2
Item, 70463 = Add link to bookmarks
Item, 50216 = Copy link
Item, 50761 = Save link
Item, 67350 = Download url
Item, "Scan link with Dr.Web" = "Go to Page, "javascript:document.location='http://online.drweb.com/result?url='+escape('%l')""
--------------------3
...
[Document Popup Menu]
Item, 50426, = Back
Item, 50427, = Forward
Item, 67648, = Rewind
Item, 67649, = Fast Forward
--------------------1
Item, 50428, = Reload
Submenu, 200000, Reload Menu
;Item, 50429, = Stop
;Item, 50430, = Go to homepage
--------------------2
Item, 70464 = Add to bookmarks, 1
Item, 50215 = Copy document address
Item, 65178 = Send document address in mail
Item, "Scan link with Dr.Web" = "Go to Page, "javascript:document.location='http://online.drweb.com/result?url='+escape('%u')""
--------------------3
...
[Image Link Popup Menu]
Item, 67389 = Open link
Item, 53018 = Open link in new page
Item, 53019 = Open link in background page
--------------------1
Item, 54020 = Open link in new window
Item, 67633 = Open link in background window
--------------------2
Item, 70463 = Add link to bookmarks
Item, 50216 = Copy link
Item, 50761 = Save link
Item, 67350 = Download url
Item, "Scan link with Dr.Web" = "Go to Page, "javascript:document.location='http://online.drweb.com/result?url='+escape('%l')""
--------------------3
Как пользоваться онлайн-проверкой ссылок?
Вы хотите посетить какую-то страницу в Интернете, но не уверены, что там нет вирусов. Щелкните правой кнопкой мышки по ссылке, которую Вы хотите посетить. В открывшемся контекстном меню выберите пункт "Проверить ссылку Dr.Web".
Дождитесь результата проверки и в зависимости от него принимайте решение о посещении страницы или скачивании файла.
Как удалить онлайн-проверку ссылок с моего компьютера?
Выполните обратные действия – подкорректируйте конфигурационный файл, удалив то, что добавили при его редактировании.
freedrweb.com
понедельник, 25 июня 2007 г.

суббота, 23 июня 2007 г.
Установка панели инструментов
Чтобы установить панели инструментов, нажмите на ссылки.
Opera 9 Technical Preview 1 Toolbar Setup...
Minimalist toolbar setup (Firefox/Internet Explorer user friendly)...
Firefox-like toolbar setup for Opera 9...
После установки панели инструментов Firefox-like, Вам нужно будет дважды нажать Ctrl+F8, чтобы должным образом удалить старую панель.
Opera 9 Technical Preview 1 Toolbar Setup...
Minimalist toolbar setup (Firefox/Internet Explorer user friendly)...
Firefox-like toolbar setup for Opera 9...
После установки панели инструментов Firefox-like, Вам нужно будет дважды нажать Ctrl+F8, чтобы должным образом удалить старую панель.
Operapedia 1.6.5
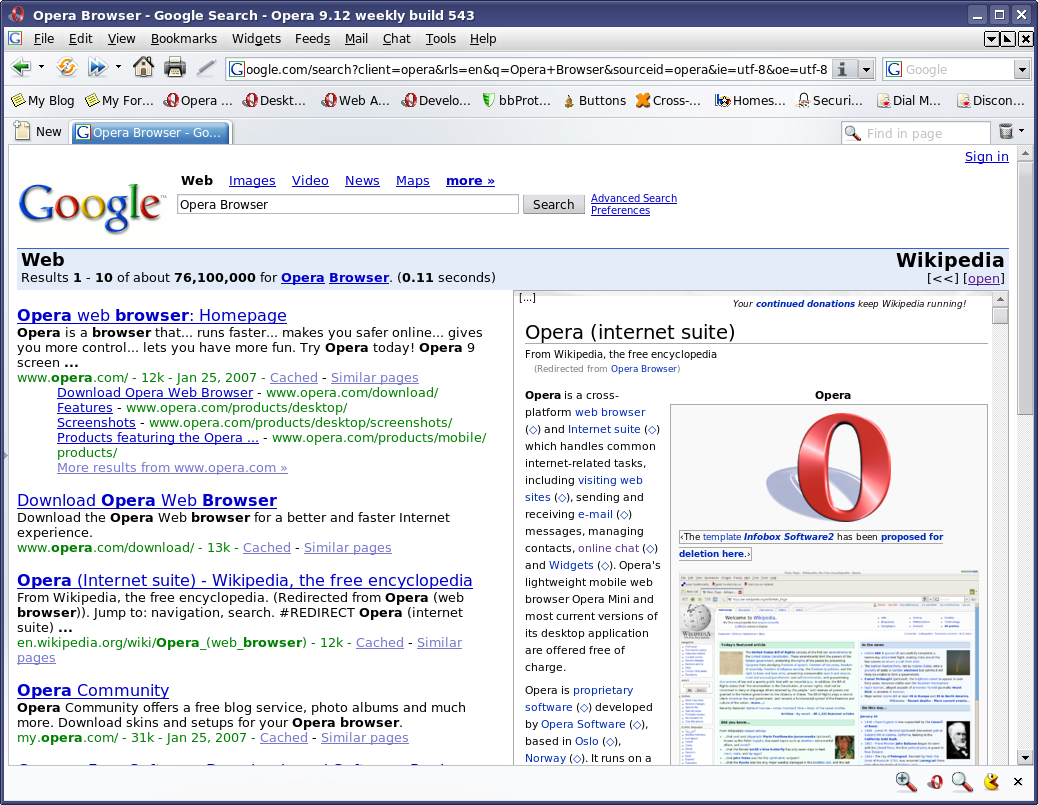
Operapedia is a UserJS script for Opera 8 and Opera 9 that embeds a Wikipedia article relevent to your current Google search right into the Google page (screenshot) (download).
Yes, this UserJS modification was inspired by Googlepedia for Firefox. In version 1.3 the ability for the script to change your Google search as your Wikipedia search changed was added. In recent versions this behavior has been modified so that it does not happen unless you click the little diamond-shaped link in parenthises that follows a link to another Wikipedia article. This was changed to allow you the option to leave you Google search alone, or to change it to reflect the Wikipedia article you are viewing.
As of version 1.6 the Wikipedia iFrame will not be shown (by default) if there are no Wikipedia search results for your Google search.
This modification was made by scipio. It was suggested in this post on the My Opera Forums, and will be submitted to UserJS.org when they get all of their problems worked out.
By default the Wikipedia page is displayed in the Google page whenever an article is found that matched your Google search. This can easily be changed so that it only appears when you click a link simply by editing the script. There are some variables at the begining of the script (just after the version list), such as ShowWikipediaByDefault which lets you control if the Wikipedia frame opens by default. The option GoogleLeftWikipediaRight has been removed in version 1.1 as a fix has been added that should allow it to automatically change sides depending on which side of the page Google's search results are on (allowing for better multi-language support).
On this page I will attempt to explain how to download this script, and set up Opera 9 to use it (it may be slightly different in Opera 8).
If you would like a video demonstration as well, then you can watch this. It shows the basics of setting up UserJS for the first time. If you already have UserJS set up, you do not need to create a new directory for Operapedia, but simply need to save it in your current UserJS directory. The video is just short of 9MB, and is encoded in Theora. It will play in VLC Media Player, MPlayer, and Xine. To play it in Windows Media Player, you will need to install an OGG Codec that supports Theora video.
Firstly, you need to create a folder somewhere on your computer where you want to save your UserJS files. Pick a place that is easy to get at such as a new folder in your My Documents folder (or your home directory, for you fellow Linux geeks). I recommend that you keep the folder name simple, such as "UserJS", and only use it for UserJavaScript files.
Now that you've created your UserJS folder, you need to save the Operapedia JavaScript file in that folder. Download Operapedia, navigate to the new folder you created, and save the script there. The script should have the name operapedia.js after you save it (Windows users please note that Windows ME/2000/XP/2003/Vista all hide the .js on the end of the file name).
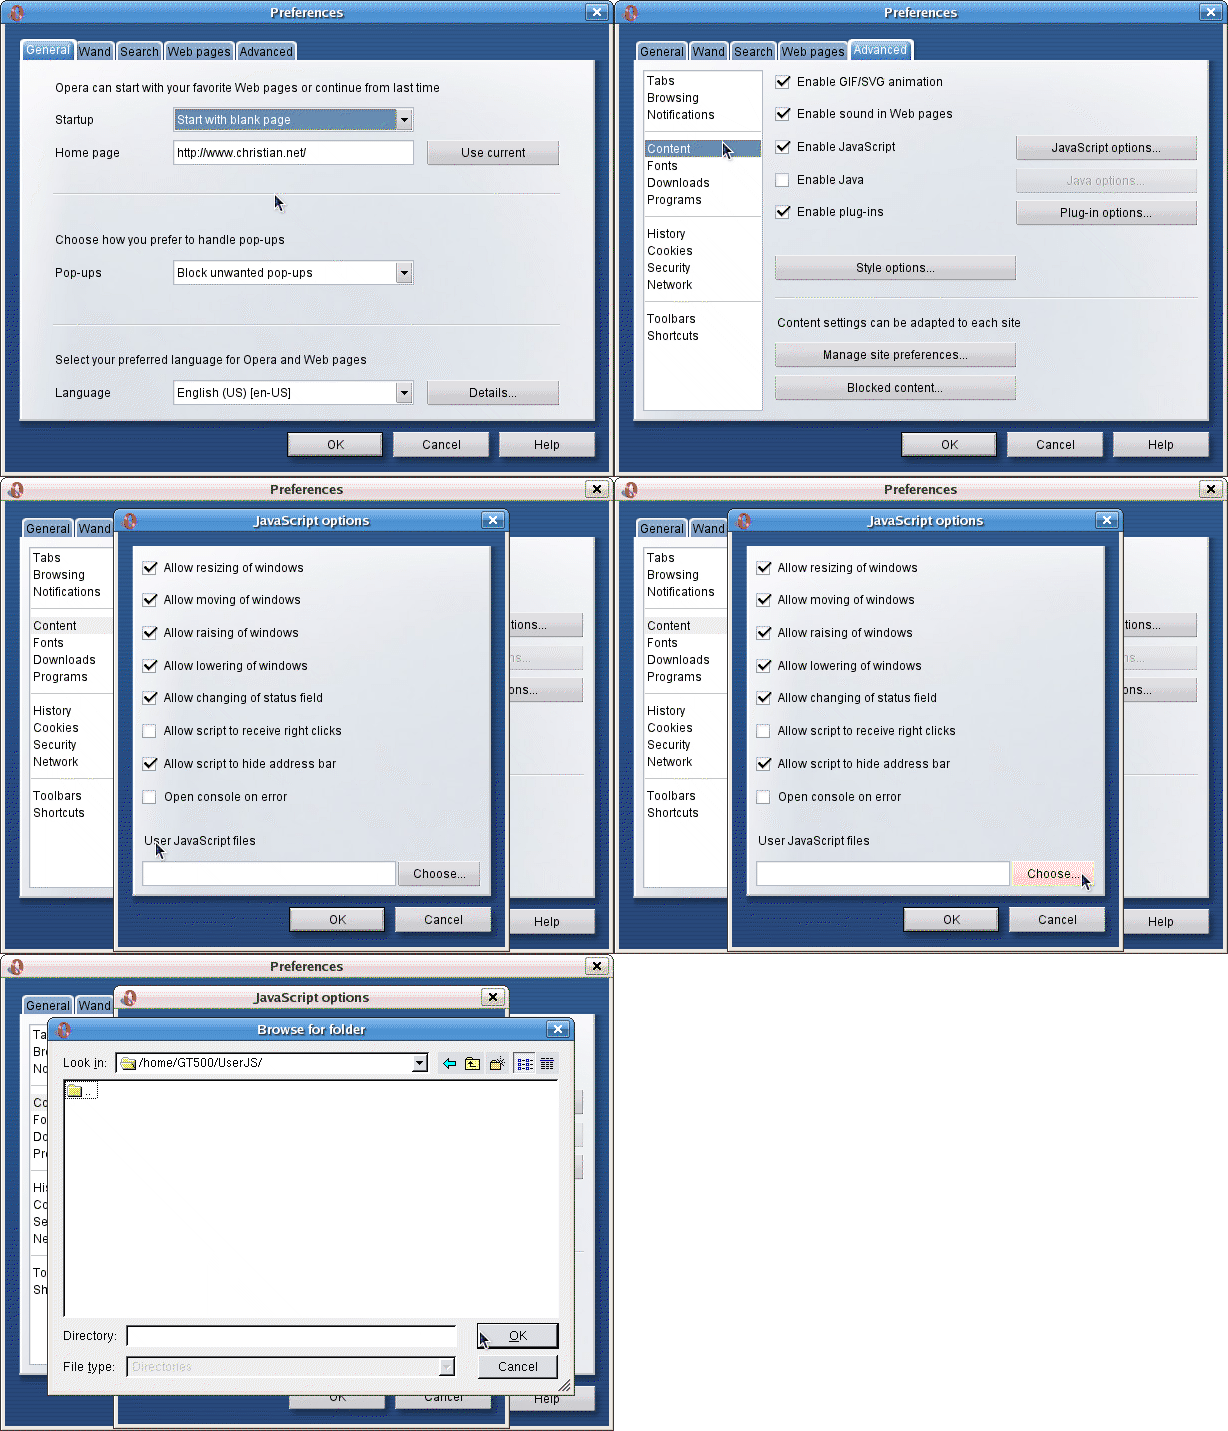
OK, now that you've got the Operapedia JavaScript file downloaded, you need to set up Opera to look in that directory for UserJS files. First, lets press Alt + P which pops up the preferences dialog. Click on the "Advanced" tab. There is a list on the right, click on the word "Content" like in this picture (animated version):

Now click on the "JavaScript options" button, like in this picture:

A new dialog box with some JavaScript options will pop up. At the bottom is the text field where you can type in the path to the folder you saved Operapedia in (or you can click on the 'Choose' button to browse around, and select the folder) just like in this picture:

(The pictures where taken in Opera 9 for Linux, the path will look different in Windows)
After all of that, you should now be able to do a Google search with integrated Wikipedia results in the Opera Web Browser.
opera.gt500.org
Yes, this UserJS modification was inspired by Googlepedia for Firefox. In version 1.3 the ability for the script to change your Google search as your Wikipedia search changed was added. In recent versions this behavior has been modified so that it does not happen unless you click the little diamond-shaped link in parenthises that follows a link to another Wikipedia article. This was changed to allow you the option to leave you Google search alone, or to change it to reflect the Wikipedia article you are viewing.
As of version 1.6 the Wikipedia iFrame will not be shown (by default) if there are no Wikipedia search results for your Google search.
This modification was made by scipio. It was suggested in this post on the My Opera Forums, and will be submitted to UserJS.org when they get all of their problems worked out.
By default the Wikipedia page is displayed in the Google page whenever an article is found that matched your Google search. This can easily be changed so that it only appears when you click a link simply by editing the script. There are some variables at the begining of the script (just after the version list), such as ShowWikipediaByDefault which lets you control if the Wikipedia frame opens by default. The option GoogleLeftWikipediaRight has been removed in version 1.1 as a fix has been added that should allow it to automatically change sides depending on which side of the page Google's search results are on (allowing for better multi-language support).
On this page I will attempt to explain how to download this script, and set up Opera 9 to use it (it may be slightly different in Opera 8).
If you would like a video demonstration as well, then you can watch this. It shows the basics of setting up UserJS for the first time. If you already have UserJS set up, you do not need to create a new directory for Operapedia, but simply need to save it in your current UserJS directory. The video is just short of 9MB, and is encoded in Theora. It will play in VLC Media Player, MPlayer, and Xine. To play it in Windows Media Player, you will need to install an OGG Codec that supports Theora video.
Firstly, you need to create a folder somewhere on your computer where you want to save your UserJS files. Pick a place that is easy to get at such as a new folder in your My Documents folder (or your home directory, for you fellow Linux geeks). I recommend that you keep the folder name simple, such as "UserJS", and only use it for UserJavaScript files.
Now that you've created your UserJS folder, you need to save the Operapedia JavaScript file in that folder. Download Operapedia, navigate to the new folder you created, and save the script there. The script should have the name operapedia.js after you save it (Windows users please note that Windows ME/2000/XP/2003/Vista all hide the .js on the end of the file name).
OK, now that you've got the Operapedia JavaScript file downloaded, you need to set up Opera to look in that directory for UserJS files. First, lets press Alt + P which pops up the preferences dialog. Click on the "Advanced" tab. There is a list on the right, click on the word "Content" like in this picture (animated version):
Now click on the "JavaScript options" button, like in this picture:
A new dialog box with some JavaScript options will pop up. At the bottom is the text field where you can type in the path to the folder you saved Operapedia in (or you can click on the 'Choose' button to browse around, and select the folder) just like in this picture:
(The pictures where taken in Opera 9 for Linux, the path will look different in Windows)
After all of that, you should now be able to do a Google search with integrated Wikipedia results in the Opera Web Browser.
opera.gt500.org
Your In-Line Spell Check for Opera
The OSpell UserJS script is a JavaScript customization for the Opera Web Browser. It allows in-line spell checking at the click of a button, or the tap of a couple keys.
This UserJS is split into two scripts, OSpell (download) and OSpell Preferences (download). The preferences file has been updated, and the name changed, as of version 1.0 beta 27, so make sure to delete your old preferences file before installing the new one. Please remove older versions of OSpell before you download this, as they could interfere with each other, and not work at all. That applies for Orangoo Spell Check as well. When using this, it is best if you do not have any other in-line spell checking scripts installed.
The OSpell Preferences script is entirely optional, and allows you to define your own custom settings, including which engine to use (line #16) and if the script should not display the language selector (uncomment line #19). You can open this in a simple text editor, such as Notepad, Notepad++, CrimsonEditor, etc. By default I have the spell check engine set to use the server provided by fearphage, but it can be easily changed in the preferences.
If you don't know how to set up UserJS in Opera, then you can watch this video. It shows the basics of setting up UserJS for the first time. If you already have UserJS set up, you do not need to create a new directory for OSpell, but simply need to save it in your current UserJS directory. The video is just over 10MB, and is encoded in Theora. It will play in VLC Media Player, MPlayer, and Xine. To play it in Windows Media Player, you will need to install an OGG Codec that supports Theora video.
If you need to ask questions, or want to make a suggestion, then please feel free to leave a post in the My Opera Comunity official forum topic or in my OSpell forum.
Here are some of the new feaures of OSpell:
It can use either Orangoo spell check, or the GMail spell check as it's engine. This option is easy to change in the preferences on line #16 (refer to the comment on line #15 for more info).
It is as fast as Orangoo Spell Check version 3, but the code is smaller, and all contained in one script.
Support for spell checking in text fields (single-line fields) in addition to text areas (multi-line fields).
External preferences can be set in OSpell Preferences script. This makes upgrading easier, as you won't have to set up OSpell every time a new version is released.
The combo box that allows you to select your language can be easily disabled in the preferences. Just edit line #19 and remove the two slashes "//" from the left side. You can also define which languages you want the script to show in the combo box on this line.
Here are some of the features that the script has inherited from the Orangoo Spell Check scripts:
Works inline with no popups.
Works with textareas added dynamically through JavaScript.
Supports keyboard shortcuts: Ctrl+, (comma) to activate spellcheck, Ctrl+Enter to accept changes, and Ctrl+' (apostrophe) to cancel spellcheck.
Easy keyboard navigation. Use spatial navigation (hold Shift while presing arrow keys) to navigate misspelled words. Press numbers 1-9 to select from listed suggestions for a misspelled word, or press 0 to keep original word.
Support for RTL text.
Various other small tweaks and changed.
OSpell was created by Sombria with some help from d.i.z.. The official forum topic can be found here at the My Opera Community.
This UserJS is split into two scripts, OSpell (download) and OSpell Preferences (download). The preferences file has been updated, and the name changed, as of version 1.0 beta 27, so make sure to delete your old preferences file before installing the new one. Please remove older versions of OSpell before you download this, as they could interfere with each other, and not work at all. That applies for Orangoo Spell Check as well. When using this, it is best if you do not have any other in-line spell checking scripts installed.
The OSpell Preferences script is entirely optional, and allows you to define your own custom settings, including which engine to use (line #16) and if the script should not display the language selector (uncomment line #19). You can open this in a simple text editor, such as Notepad, Notepad++, CrimsonEditor, etc. By default I have the spell check engine set to use the server provided by fearphage, but it can be easily changed in the preferences.
If you don't know how to set up UserJS in Opera, then you can watch this video. It shows the basics of setting up UserJS for the first time. If you already have UserJS set up, you do not need to create a new directory for OSpell, but simply need to save it in your current UserJS directory. The video is just over 10MB, and is encoded in Theora. It will play in VLC Media Player, MPlayer, and Xine. To play it in Windows Media Player, you will need to install an OGG Codec that supports Theora video.
If you need to ask questions, or want to make a suggestion, then please feel free to leave a post in the My Opera Comunity official forum topic or in my OSpell forum.
Here are some of the new feaures of OSpell:
It can use either Orangoo spell check, or the GMail spell check as it's engine. This option is easy to change in the preferences on line #16 (refer to the comment on line #15 for more info).
It is as fast as Orangoo Spell Check version 3, but the code is smaller, and all contained in one script.
Support for spell checking in text fields (single-line fields) in addition to text areas (multi-line fields).
External preferences can be set in OSpell Preferences script. This makes upgrading easier, as you won't have to set up OSpell every time a new version is released.
The combo box that allows you to select your language can be easily disabled in the preferences. Just edit line #19 and remove the two slashes "//" from the left side. You can also define which languages you want the script to show in the combo box on this line.
Here are some of the features that the script has inherited from the Orangoo Spell Check scripts:
Works inline with no popups.
Works with textareas added dynamically through JavaScript.
Supports keyboard shortcuts: Ctrl+, (comma) to activate spellcheck, Ctrl+Enter to accept changes, and Ctrl+' (apostrophe) to cancel spellcheck.
Easy keyboard navigation. Use spatial navigation (hold Shift while presing arrow keys) to navigate misspelled words. Press numbers 1-9 to select from listed suggestions for a misspelled word, or press 0 to keep original word.
Support for RTL text.
Various other small tweaks and changed.
OSpell was created by Sombria with some help from d.i.z.. The official forum topic can be found here at the My Opera Community.
Подписаться на:
Сообщения (Atom)